Tuesday 19 February 2013

The Blue Skies skirt A.K.A Vogue 1247

A skirt made in two weeks - that's got to be a record for me! Vogue 1247 had been on my mind ever since I saw this gorgeous version by BlueSewnCat.  It's a popular pattern in sewing-blog land and most of the reviews said it was pretty straightforward so thought I'd give it a go.  When I ordered the pattern from Jaycotts it was a bonus to see that the pattern also included a top I'd first admired as made and worn by the ever-stylish SallieOh - seriously I get way more enjoyment out of looking at the creations of sewing bloggers than from fashion magazines now!  The bright blue of this skirt made me feel very spring-like on Sunday when I wore it for the first time.

Photo of new me-made Vogue 1247 (V1247) skirt
Not quite sure what I'm looking at here but this was the best of the photos -  I don't like getting my photo taken!


To start with I was on a role, skirt cut out and most of it sewn up within a week! However, then it came to the waistband and it all came a bit unstuck.  I just couldn't get my head round the waistband instructions.  One week later, and with some great instructions courtesy of Toile & Trouble, and I have a finished skirt!

I've already worn it twice, first to see Stoker at Curzon Soho on Sunday, then to work again yesterday, and I really love it! It's the neatest item I've made so far (I know I also said that about the last dress but think this is even neater), and the fabric is really softm has a lovely crosshatch pattern and is a really vibrant blue.  The pattern recommend using biastape to finish all the seams and the versions I've seen other folk made do look really professional done like this.  However I was too impatient so most of my seams are finished with the overlock foot on my Bernina except the waistband which I did use bias trim for (you can just see the orange bias tape in the photo below).  I used a hook and eye fastening but next time I might follow BlueSewnCat's lead and go for a button instead or get a bigger hook and eye as the one I used is extremely fiddly.  The next version I'll probably just finish the seams with my overlock foot too as my priority is to get a few skirts made quickly as I'm so fed up with dark winter dresses!

Photo of new me-made Vogue 1247 (V1247) skirt
The troublesome waistband
The pattern cost about £13 from Jaycotts. The fabric was from The Cloth House and was either £10 or £20 a metre.  I'd bought a metre and managed to make this no problem so whichever cost it's still a good price for a skirt! I've already cut out my second version and have a third planned so I'll definitely get lots of use out the pattern - and am looking forward to trying the top at some point too.

Blue Skies as sung by Willie Nelson never fails to lift my spirits so I've been listening to it a lot on the dark bus ride home from work -
Blue skies smilin' at me
Nothin' but blue skies do I see
Bluebirds singin' a song
Nothin' but blue skies from now on
 - Can you tell I'm just wishing for Spring now?!

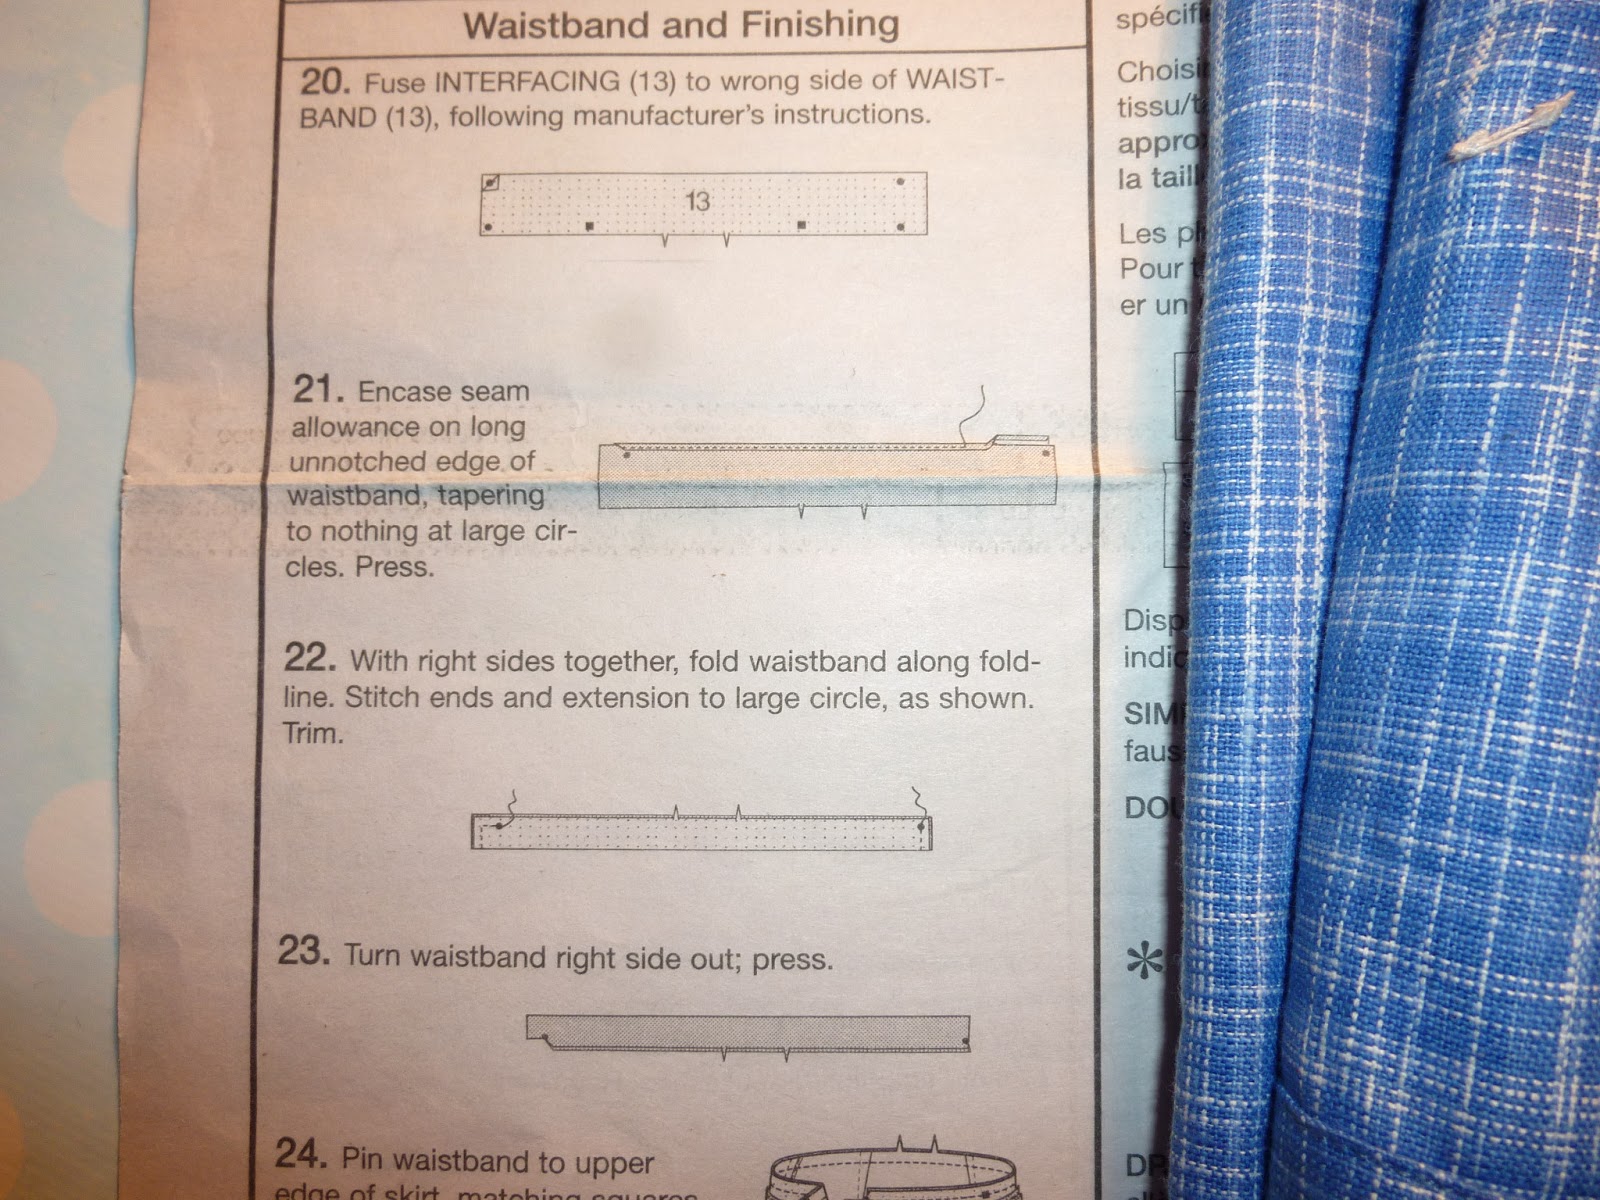
N.B. Edited to add waistband advice from Toile & Trouble - these are supplementary and won't make much sense without the instructions given with the V1247 pattern.

To start with, your waistband is in one piece. It will be folded down the middle lengthways to form inner and outer. I would actually start by pressing it into place as it helps to identify it as inner and outer pieces.
21.  Apply bias binding to the edge of the un notched edge between the dots (this will eventually be the inner waistband). The tapering bit sounds a bit tricky, but I think it just means cut it at an angle so it will not be lumpy later on. You could finish this edge with a neat zigzag/overlock stitch which would eliminate lumpiness later on, but bear in mind it will be visible on the inside of the skirt.
22. With right sides together, fold the waistband down the middle lengthways and sew as the diagram shows.
23. As instructions state.
24. Right sides together, pin your notched edges (outer waistband) to the top edge of the skirt, match all your markers up, and the square edges of the waistband to the opening edges. Stitch outer waistband to top edge of skirt. Trim and press towards waistband.
25. I don’t know what they mean by “blindstitch”, but at this point I would favour stitch in the ditch. Press your inner waistband in place, pin, with pins on outside of skirt. Look inside at the inner waistband - the edge you have finished should cover the join where you attached the outer waistband. Working from the outside of the garment (the one which will be on show) stitch right in the join between the waistband and the skirt fabric. If you have problems with this, try to find a youtube video for “stitch in the ditch” and I’m sure you’ll get it.

Monday 11 February 2013

Waistband problems

Hello there! I'm sure the probloem is more with me than with the waistband instructions but I'm kind of stuck. Last week I started working on a Vogue 1247 skirt - my aim being to have it finished by Sunday evening.  It was all going well until it came to the waistband.  I just can't make sense of the instructions and after one attempt of sewing it up then unpicking it all I thought I would ask if any of you kind readers can help me out?!


The problem starts with the first instruction ‘encase seam allowance on long unnotched edge of waistband, tapering to nothing at large circles’ – this sounds simple enough but I just can’t match the instructions up with the diagram.

First off -  am I right in thinking I’m doing this on the right side of the fabric, that’s what this looks like right? And it looks like the waistband is unfolded at this point so I don’t really understand why to stitch the seam allowance on to the right side of the fabric. However I decided to give this a go.
Next step - ‘with right sides together, fold waistband along foldline. Stitch ends and extension to large circle as shown’. Ok so I did this and was left with a long folded waistband which is only stitch together at the two ends but not in the middle on the notched side.
Next step - ‘turn waistband right side out. Press’ it looks like there’s stitching all the way along the notched side but I just can’t see this in any of the steps.

Am I being really thick here? Has anyone else who made this skirt had any problems with the waistband or is it just my complete inexperience that’s causing me problems here? If you’ve made this skirt and have any advice for me, or just have any advice in general about doing waistbands, I’d be really grateful for any help! I’m planning to have another go tonight and maybe just use my Reader’s Digest instructions on doing a waistband rather than following these ones.

Tuesday 5 February 2013

Teal dress success

It's pretty obvious by now that I'm terrible at remembering to take photos of myself in things I make - partly this is because if I'm out having fun I forget to ask friends to take photos of me, but it's also just being a bit embarrassed about taking selfies! However I'm going to have to get over this - either by getting a tripod and getting over taking photos of myself, or by remembering to ask friends to take them for me. So this morning in the interests of this blog and my readers (hello there!) I asked my husband to take some photos before I left for work!

McCalls 2401

This dress is my third, and for now final, McCalls 2401.  Making the same pattern three times, without any alterations, might sound a bit boring but I've found it so helpful for developing my basic sewing skills.  This dress is by far the neatest and best-fitting of the three.  What a difference it made working with good quality fabric as well! I can't remember what this fabric is called but it's a bit silky so it doesn't need lining and it's got a really nice cross weave to it - although it also frays terribly!  The invisible zip is the most invisible I've done yet and I think the sleeves are also the neatest of the three dresses.  Every time I put it on to go to work I get a wee smile of satisfaction that 'I made this!' and it has really given my sewing confidence a real boost. 

McCalls 2401

The colour of this fabric just makes me so happy! I love teal and this is a particularly rich shade.  I think I may have just enough left for a tiny pocket tank too - bonus! Next up - get some photos of the second McCalls 2401 I made for a wedding - I wear it quite often at the weekends and love it too but have yet to remember to take a photo.
 
Love the colour!